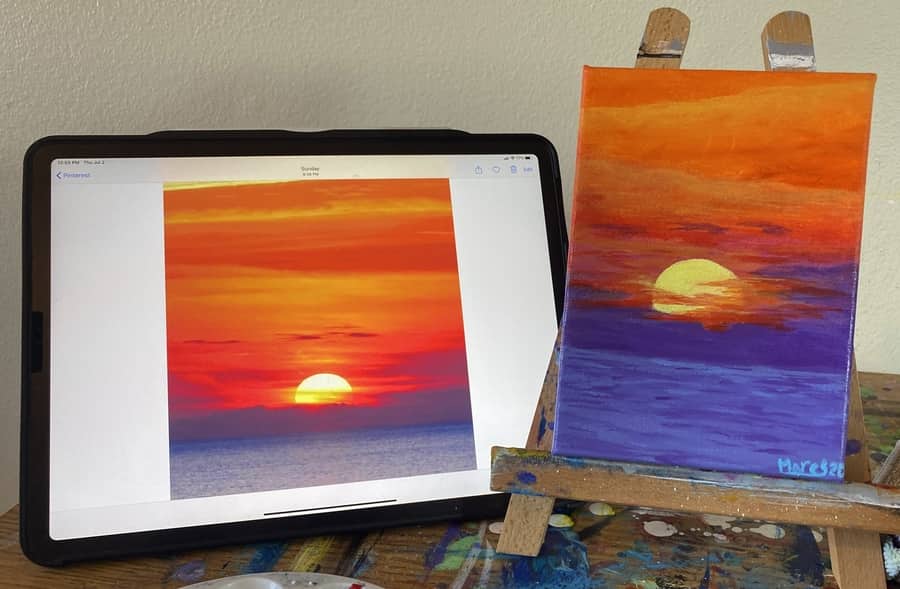
Who doesn’t love a beautiful sunset? Painting a sunset isn’t all that difficult either. There are lots of different types of sunsets to paint too.
We can do a mountain sunset, a beach sunset, or even a desert sunset!
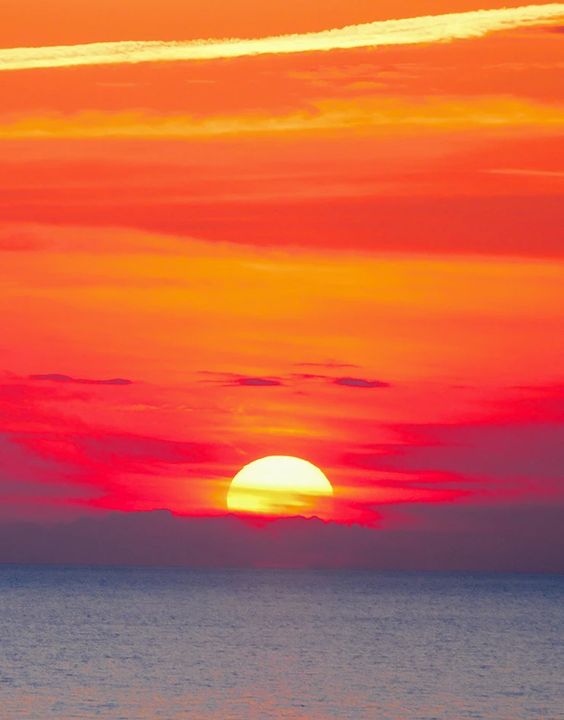
For this painting lets do an ocean sunset. Look for a simple photo or image of a sun setting on a watery foreground.
I generally go to Pinterest when looking for a reference to use. For this example, I will be using this photo here.
After finding it on Pinterest I tried to figure out its source to make sure I was giving credit where it is due but it originally comes from a company called Stickerbrand.
I wasn’t able to figure out who the photographer was but the image is used on full wall sticker murals which is what the company Stickerbrand sells.
Before we dive into the steps I took to create my painting lets look at the colors and tools used first.
Related Articles:
- How To Paint A Galaxy (Easy Step by Step Guide)
- How To Paint A Butterfly for Beginners
- How To Paint a City Skyline (Textured and Abstract Style!)
- How To Paint Water (A Step by Step Guide)
- How To Paint a Campfire With a Soft Glow
Tools and Materials Used
The colors you will need for your painting depend on the reference you are using. If you are going to use the same one as in this example just try to select a palette of colors as close to what you see here as you can.
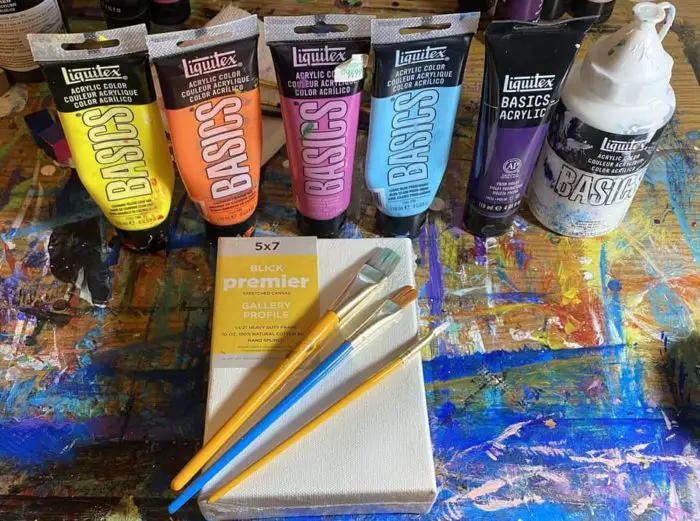
For our paints we have today, from left to right we have all Liquitex Basics paints of:
- Cadmium Yellow Light Hue
- Cadmium Orange Hue
- Medium Magenta
- Light Blue Permanent
- Prism Violet
- Titanium White
- Primary Red
It’s totally fine if it isn’t perfectly accurate. That’s the beautiful thing about art! You as the creator have the choice of how you want to represent what you’re seeing.
For me, I want to get close to what we see in the picture in this one.
For my canvas, I’m using a 5″ x 7″ gallery profile canvas from Blick Art Supplies. The gallery profile canvas has a thickness of 1.5 inches.
As for my paint brushes I’m using different sized square headed brushes.
Every time I start a new painting like this, especially when it is something I have never done before, I just gather up an approximation of what I think I might need or use to complete this image. I don’t always use everything I think I am going to and sometimes I have to get other tools I didn’t know I would need.
One thing I had to add to my palette once I got going was Primary Red. It wasn’t in the above picture because I didn’t realize I would want or need it. I also had to experiment with several additional reds later in Step 7 too.
Optional First Step: Apply Gesso
For the first step, I took on this painting I decided to prep my canvas with a few layers of gesso.
Even though the Blick canvas comes primed it has a very coarse texture to it. It is far more coarse than most of the canvases that I have experienced painting on so far.
So I decided to use Liquitex Gesso to try and fill in some of that texture and smooth out the surface. Gesso is a primer one can use to add texture or in this case smooth it out.
I only did two layers of gesso but still had some difficulty getting the paint to flow across the canvas smoothly.
I likely would have been better off with 4 to 6 layers to get the smoother surface I wanted.
If you like the textures you get from the canvas for your painting or it’s just not something that bothers you at all then this step isn’t really needed. It all depends on what you like.
It also may not be needed on other types of canvases that don’t quite have the depth of texture this one does.
Start With Your Background Colors
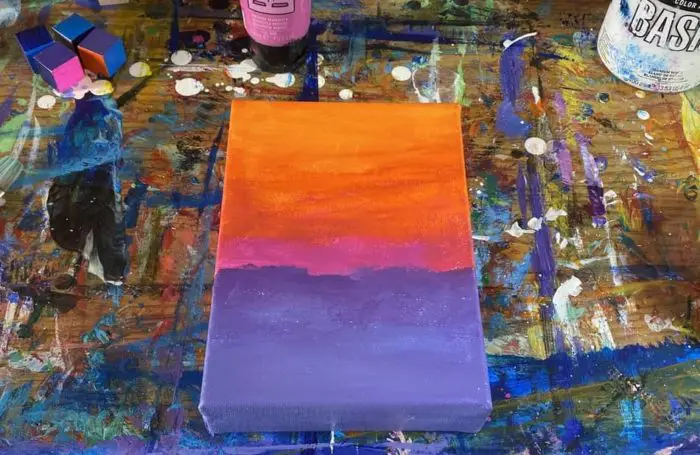
For the first step, we are just going to try and get the gradient and major areas of colors down on the canvas.
We are laying down the foundation of our painting. The background.
It doesn’t need to be perfect we just need to get a basic representation of our colors, shapes, and gradients. The basic layout and composition is the objective of this step.
I decided to lay my painting out vertically and aimed for the top half of the painting to take up roughly 2/3’s of my surface. Creating the bright orange sky reflecting the beautiful luminescence of the sunset.
I started at the top with an orange-yellow mixture and brought the blend down into dark orange as it transitions over to the magenta area.
Next I mixed my Light Blue Permanent with a tad bit of Prism Violet to get the slight blue-purple color of the water. I brought my water gradient up from the bottom of the painting making the area where the clouds meet the sun much darker.
Keep in mind with every successive layer and step we do the picture will become more refined and more into focus. So if at this stage of the painting it looks sloppy or you make a mistake that is something we can make better with each successive layer we add.
Add Your Sun and Begin Refining Your Gradients
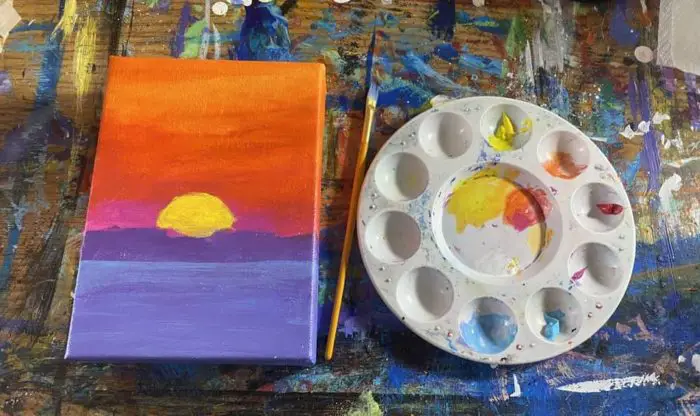
In step 2, we want to refine our first layer a bit. I still had a number of patches on the canvas that I hadn’t totally covered that I needed to focus on first.
Taking more of my orange and yellow I tried to blend my sky a bit more into the area closer to the area where the sun was going to be.
Then I added the sun. At first, I made it a bit too white so I ended up adding a light layer of yellow but I think it still needs a bit more orange too. I may have made it a bit larger than it needed to be too so that is something I will try to correct on the next layers.
You may have noticed in the first step that I didn’t have a clear separation between the purple bed of clouds the sun is sitting on and the horizon line making up the surface of the ocean.
In this step, I wanted to add that detail so I mixed a tiny dab of purple with my blue and added a bit of water by dipping my brush. When you want your paint to dry a bit more transparently it’s always good to do that by adding just a bit of water.
This will be a good technique to use again in our next steps as we add our clouds and other details in the sky.
Blend Sky Gradient and Add Light Clouds
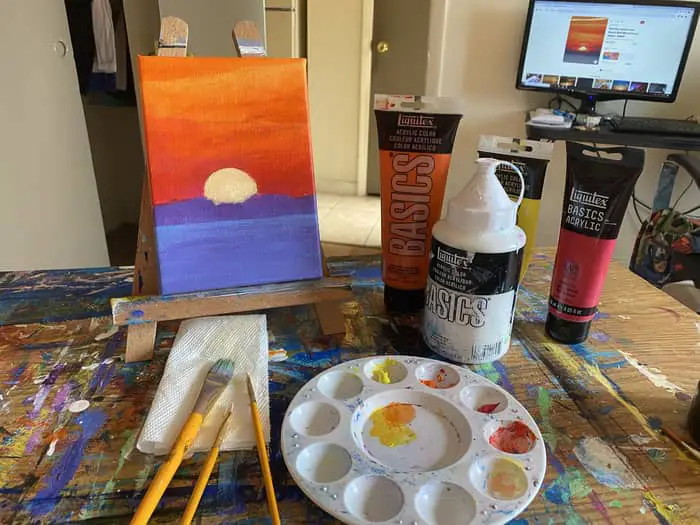
For this step,I brought in a bit of Primary Red to help get my gradient between the orange and pink areas of my painting more seamless.
Before I did that I began by adding some of the yellow-orange clouds we see in the picture.
To do this I actually used a technique I saw Bob Ross use the other day. I don’t often watch Bob Ross but I happened to come across a short clip where he was demonstrating his technique for painting clouds.
You basically apply the paint with one brush and then use a dry brush to help soften up the areas of the cloud you want to look more like mist.
I also tend to add a few drops of water to my paint mix for clouds so the end up being more transparent. In this way I can carefully build the clouds up with each layer I do to get a better effect.
If the clouds were larger or more thick then you would want to use far more paint and avoid adding any water to it at all. The technique you use for your clouds again will depend on your reference photo.
I as I came down closer to the sun I wanted to get rid of some of the hard differences I originally had between the orange and pink areas. We needed this to be more of a gradient for now.
In one of the next steps we will be adding more layers on top of this area to try and get some of that hazy red pink glow that we have going on in our reference picture.
Finally, I tried to adjust the color of the sun and make it a bit brighter but am finding it difficult to get the hue of the sun the correct mix of yellow, orange, and white.
While I’m still not totally satisfied with that color we will see how it looks as we add more clouds and details.
Add Brighter Clouds Around The Sun In Pink
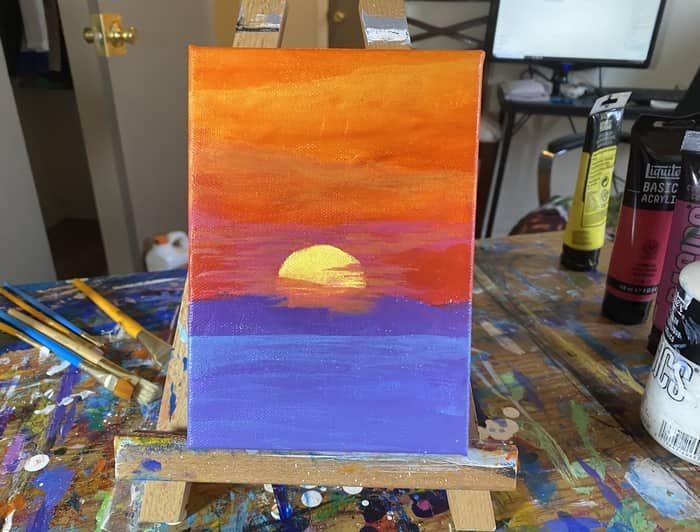
In Step 4 we start to see the picture coming together a bit.
I focused mainly on trying to add the glowing clouds that we see surrounding the sun in our picture. I haven’t yet achieved the brightness or vibrancy I want in this section and will continue to fill it out in our subsequent steps.
I used my magenta, primary red, and orange all in variations in this section. Applying them lightly in horizontal strokes used a square headed brush. Giving me the sharp streaks you see.
We can consider this a smaller representation of how we started. By getting a close approximation of the colors and something laid down on the canvas we can now work on making improvements to those colors and shapes.
In our next step, we will need to fill in the orange area to the right of the sun as our dark purple clouds actually should come up much higher on that side of the sun. The purple should also blend into the orange in a gradient too
We will use the clouds from this step to help guide where and how we make this blend as well as attempt to get a brighter glow effect on our clouds.
Bring the Darker Clouds Up And Blend Where Needed
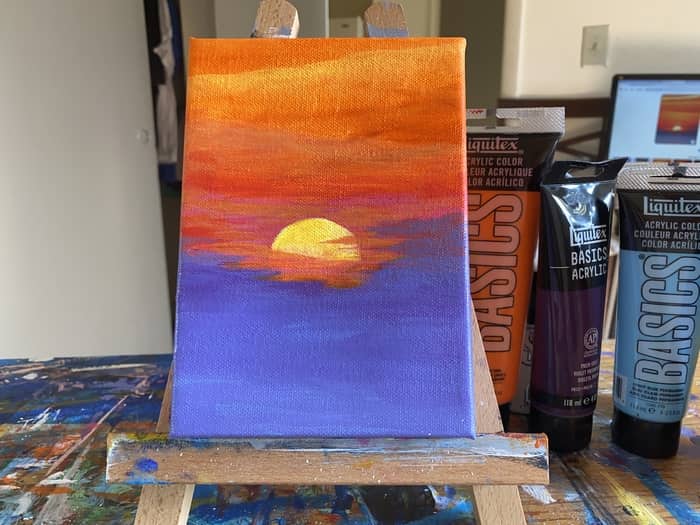
For this step, we want to bring our darker clouds up to reach up around the sun a bit.
As you can see, with step we are gradually going from the largest details down to the smallest details.
To get some of the effects of the clouds you see here you will want to use your square-headed brush in a horizontal stroke. Be sure to mix a tiny bit of water in your mix if you want the light transparent effect I’m getting.
I find it useful for getting a good blend.
Then I started to add a bit more color and highlights around the sun. Mainly just a bit of cadmium orange to help brighten it up a bit.
Then I decided I didn’t quite like where I had put the waterline and painted over it to do it better in the next step. If you don’t like it or there is something that is just bothering you then fix it!
The last thing I did was add a bit more yellow to our diagonal cloud towards the top of the canvas to make it pop a bit more. To bring it further into existence!
Remember, you’re the artist! You have the power!
Darken the Clouds Further and Add the Horizon Line
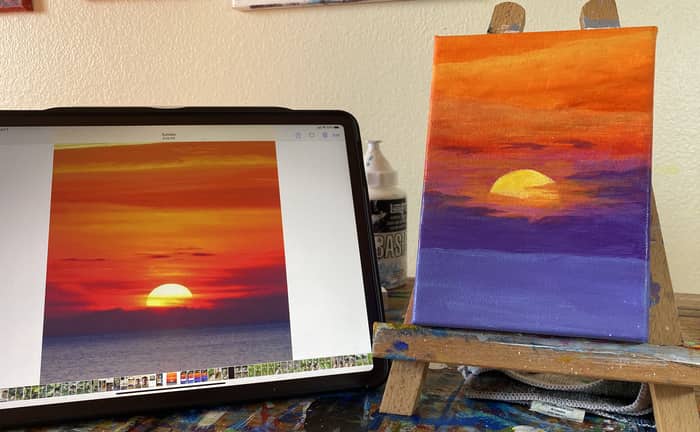
This is the step where we start to get down to the nitty gritty details. The part of the painting where it starts to become important to try and address the things that are bothering you.
For this project, getting the orange-red glow around the sun right has been driving me nuts. It’s knawing at my soul right now.
I fear that by attempting to do so I’m making the painting a bit more muddy and reducing some of the quality I had.
That said, in this step, I focused primarily on getting the bed of clouds above the horizon line a bit darker. I added the two or three small dark clouds above the sun.
In my attempt to brighten up the clouds around the sun I tried mixing my primary red with light portrait pink. This absolutely did not work.
I then tried mixing it with cadmium yellow and this made an ugly brown orange color. Likely due to the color bias of one of my paints.
Then I tried to mix it with my cadmium orange, again getting muddy results.
So in my next step, I’m going to pull out one of my other reds and see if I can get what I want. I’m not too satisfied with my horizon line or brightness of the sun as it currently is either.
As you’re working on your painting make a mental note of the things that are annoying you and challenge yourself to correct them. It’s through pushing yourself on these issues where you will find your advancements.
Sometimes if there is one thing in particular you found particularly challenging it is good to take a note of it and then on your next project focus on that detail you found so hard. Identify your weak areas and take them to the gym!
Adjust the Colors and Address any Annoyances
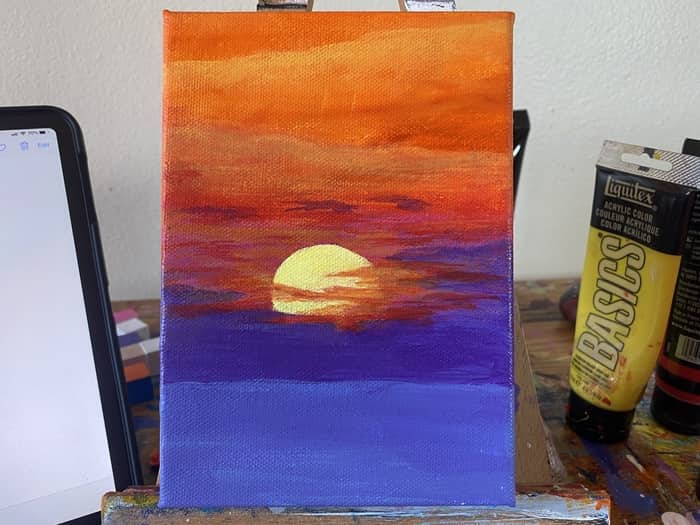
In this step, do your best to adjust the colors you have where necessary. We are coming close to finishing up so we want to take our time with it.
One thing you can do that might help if you’re having trouble with a certain color is to take a clean palette or paper plate and try to experiment with your mixes like you see me trying here.
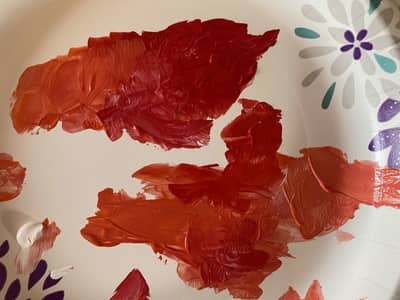
Unfortunately I still could not get the color I wanted.
Like I was referring to in the last step, this project has made it painfully evident to me that I do not fully understand how to mix my paints to get the colors I want.
I did learn the hard way not too long ago about color bias in paint when I ran out of purple and tried to mix my own. Read about how I discovered that blue and red don’t always make purple here!
I am sure that this is part of my problem right now in trying to get the color needed. Now I know I’m going to have to do a deeper dive into color mixing and figuring out the color biases of all my paints in order to strengthen my ability to make them do what I want.
Okay, now let’s finish this sunset out in step 8!
Use Horizontal Strokes to Add Waves to the Ocean
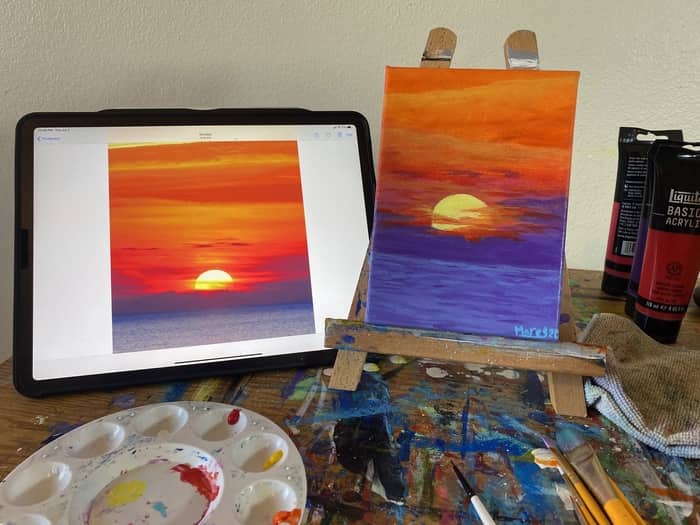
Now in step 8, you want to continue to use your square-headed brush to make horizontal strokes of varying shades of this aqua purple to create some waves.
This is basically the same sort of stroke we were using to make our clouds only with less watered down paint.
I just basically used my light blue permanent and my prism violet in varying degrees as I went to make a variety of shaded strokes across the surface of the ocean.
I did switch between two different sized square headed brushes as I went using the smaller one towards the horizon while using the larger one towards the foreground.
While this painting had a number of challenges and brought me some insights of what else I might need to study I think we have finally reached a point of completion.
Despite my annoyance with the glow around the sun I think that I accomplished a pretty decent representation of the reference picture.
Just remember, every painting and every project that you do is an opportunity to enhance your skills and learn something. There will be points in every project where you feel like you failed.
Where you feel like you created an ugly piece of crap. Push through it! Keep going! Keep refining and keep aware of potential avenues of learning.
